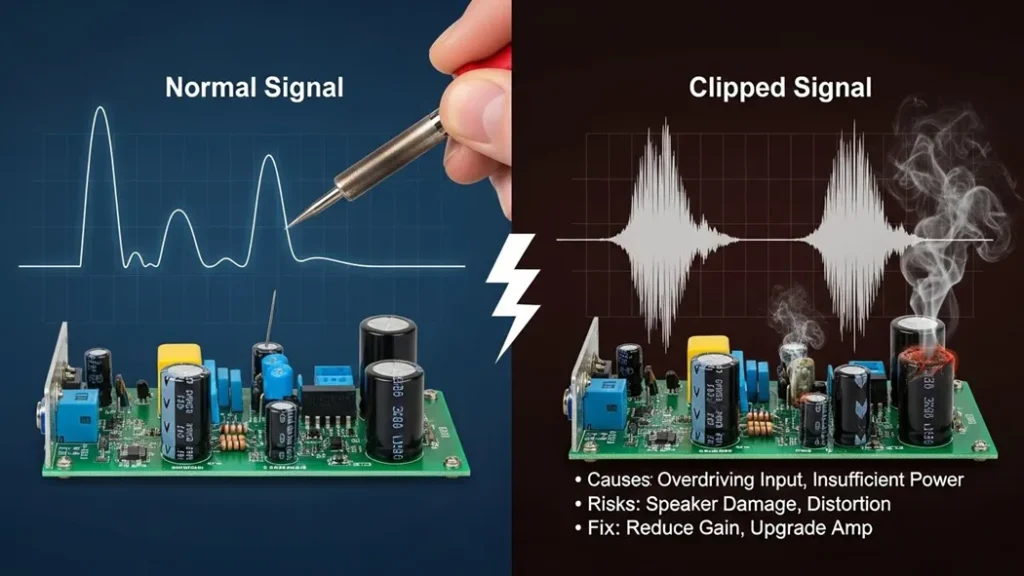
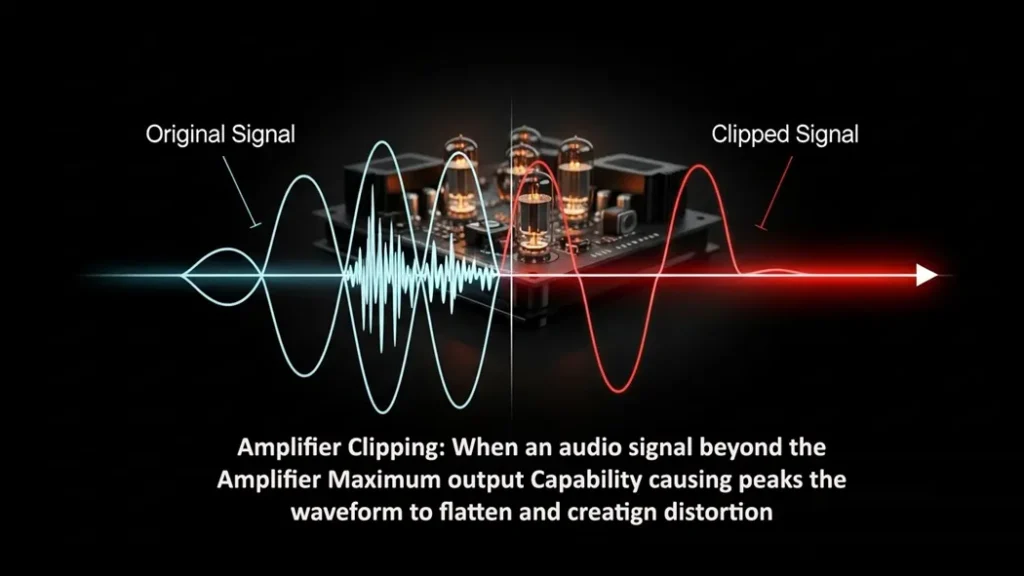
Amplifier Clipping occurs when an amplifier is pushed beyond its maximum voltage capacity, causing the peaks and valleys of the audio waveform to be “cut off” and flattened into square waves. To visualize clipping, one can use an oscilloscope or observe the “Peak” or “Clip” LED indicators on hardware, which signal that the signal is exceeding the available headroom. To fix clipping, you must reduce the gain at the source, lower the volume levels within your signal chain, or upgrade to an amplifier with a higher power rating to ensure the system can handle dynamic peaks without distorting.
What is Amplifier Clipping?
At its core, an amplifier is a device that increases the strength (amplitude) of an input signal using an external power source. To better understand the fundamental role of an amplifier, it is essential to know its limits Every amplifier has a “ceiling” or a maximum limit determined by its DC power supply rails. Clipping occurs when the amplifier is asked to produce an output voltage that exceeds what its power supply can actually provide. When the signal tries to go beyond these “rails,” the amplifier simply cannot provide the extra voltage. Imagine trying to jump in a room with a very low ceiling. No matter how much force you use to jump higher, your head will hit the ceiling, and your upward movement will stop abruptly. This is exactly what happens to an electronic signal during clipping.
Visualizing the Problem: The Flattened Waveform
In a healthy state, an audio signal is a smooth, continuous wave (usually a sine wave). However, when clipping occurs, the peaks and valleys of that wave are cut off.
- Saturation: As the signal amplitude hits the maximum voltage allowed by the power supply, it enters saturation.
- Squared-Off Peaks: On an oscilloscope, you would see that the normally rounded tops and bottoms of the waveform appear flattened or “squared off”.
- Harmonic Distortion: This change in the waveform shape introduces new, unwanted frequencies (harmonics) that weren’t in the original signal, which is what we perceive as that “harsh” distorted sound.
Why Clipping is Dangerous
Clipping isn’t just a sound quality issue; it is a hardware safety issue.
- Thermal Stress: A clipped signal carries significantly more power than a clean one. Because the waveform stays at the maximum voltage for a longer duration (the “flat” part of the square), it can cause the amplifier and the speakers to overheat.
- Speaker Damage: High-frequency drivers (tweeters) are especially vulnerable to the high-energy harmonics produced by a clipping power amplifier.
- Thermal Shutdown: If the amplifier dissipates too much heat due to excessive power draw and low efficiency, it may enter thermal shutdown to protect its internal components.
How to Fix Clipping: Practical Solutions
Fixing clipping involves balancing the relationship between your input signal and your amplifier’s power capacity.
Solution A: Reduce the Input Signal Strength
The most immediate fix for clipping is to reduce the “gain” or volume of the signal before it reaches the power amplifier stage.
Lower the Pre-amp Gain: If you are using a mixer or a preamplifier, turn down the output level. This ensures the signal entering the final power stage is small enough that even after amplification, it stays within the power supply limits.
Adjust Source Volume: Sometimes the source device (like a phone or laptop) is “hot” (too loud), causing the very first stage of the amplifier to clip.
Solution B: Increase the Power Supply Voltage
For engineers and DIY builders, the “ceiling” itself can sometimes be raised.
Raise the Rails: Increasing the power supply voltage allows for more “headroom,” meaning the signal can grow larger before hitting the limit.
Note: This is only possible during the design phase or if the hardware supports adjustable power rails. Never exceed the rated voltage of your components, or you risk permanent damage.
Solution C: Improve Biasing and Component Quality
Sometimes distortion isn’t caused by the volume being too high, but by the amplifier’s “idling” state.
Check Biasing: Proper biasing (especially in Class AB amplifiers) ensures the transistors are operating in their most linear region.
Is the “Clip” light on? Reduce the gain immediately.
Is the amp hot to the touch? Check your ventilation and biasing.
Is there a hum even when no music is playing? Check your cables and grounding.Component Integrity: Faulty capacitors can sometimes cause signal drops or instability. Replacing aged or leaking capacitors can often restore a signal to its original clarity.
Symptom Potential Cause Fix Audible Hiss/Buzz Poor grounding or lack of shielding. Use shielded cables and implement “Star Grounding. Crossover Distortion Poorly biased Class B amplifier. Use a Class AB design or adjust bias current. Intermittent Cut-outs Overheating and thermal shutdown. Ensure proper heat sinking and use thermal paste. 6. Industry Standards for Performance
To avoid these issues, professional equipment is designed according to strict standards:
IEC 60268 Series: Specifies how to test for maximum power output and frequency response to ensure the amp doesn’t clip under normal loads.
IEEE Std 1515: Provides standardized measurement techniques to define audio performance criteria.
UL 62368-1: Ensures the device is safe and won’t catch fire if it does start to overheat during clipping.

Conclusion
Amplifier clipping is essentially a “math problem” where the requested output exceeds the available resources. By visualizing the flattened waveform and understanding the limits of your power supply, you can take the necessary steps to reduce input gain or improve hardware cooling. Protect your ears and your equipment by keeping your signals within the “rails.” For a deeper look at other common issues like ground loops or component failure, Check our Troubleshooting Guide for more common faults.