Hey there, fellow tinkerers and electronics enthusiasts! Today I am diving into the world of DPDT switches – those little mechanical marvels that might seem boring at first glance but are actually the unsung heroes of countless electronic projects. Trust me, once you get to know these switches, you’ll find yourself reaching for them all the time.
What is a Double Throw Switch
Remember that time you wanted to reverse a motor’s direction with a simple flip? Or maybe you needed to switch audio between two different speakers? That is where a DPDT switch comes in handy.
A DPDT switch is essential for controlling two separate circuits simultaneously. I used them in everything from model train setups to home audio projects and they never disappoint. They are like the Swiss Army knives of the electronics world simple but incredibly versatile.
In my years of tinkering with electronics, I have found that understanding these switches can be a real game changer for your projects. So grab a coffee get comfortable and lets talk about these nifty little components that make our electronic lives so much easier.
What is a DPDT Switch?
So what exactly is this thing with the funny acronym? DPDT stands for “Double Pole Double Throw,” which honestly sounds more complicated than it is.
Let me break it down in plain English:
Double Pole: This means the switch controls two separate circuits at once. Think of it as having two switches that move together.
Double Throw: Each circuit can connect to one of two different outputs. So you are not just turning things on and off – you are choosing between two different connections.
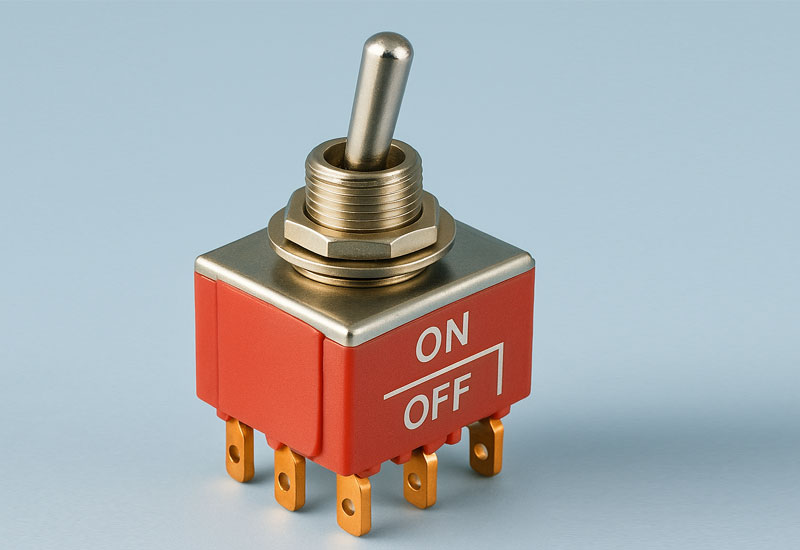
A double pole double throw switch typically has six terminals (little metal connections) arranged in two rows of three. Do not let that intimidate you! Once you understand the pattern, It is actually pretty straightforward.
I remember the first time I held one – I was confused by all those terminals until a friend explained it with a simple analogy: “It is like having two light switches taped together, but each one can connect to two different lights.
How Does a DPDT Switch Work?
Get into the nitty-gritty of how these switches actually do their thing. How does a DPDT switch work? It is all about making and breaking connections.
Inside the switch, there are two movable contacts (the “poles”) that can connect to either of two fixed contacts (the “throws”). When you flip the switch, these contacts physically move to change which connections are made. You got six terminals arranged in two rows. The middle terminals (let’s call them 1 and 4) are your “common” connections. When you flip the switch one way, terminals 1 and 4 connect to terminals 2 and 5. Flip it the other way, and they connect to terminals 3 and 6 instead.
I have found it helpful to think of it like a railroad switch that can direct a train down one of two tracks. Except here, you are directing electricity, not trains, and you are controlling two tracks at once.
The most common types you will run into are:
- ON-ON Configuration: Both positions do something. Flip it one way, you get one set of connections. Flip it the other way, you get a different set.
- ON-OFF-ON: This one has a center position that disconnects everything. Super handy when you need a neutral position.
- Momentary: These spring back to their default position when you let go – like a doorbell button.
I once spent an entire afternoon trying to figure out why my circuit wasn’t working, only to realize I had an ON-OFF-ON switch when I needed a simple ON-ON. Do not make my mistake – check your switch type before you start soldering!
Types of DPDT Switches
Let’s talk about the different flavors of DPDT switches you might come across in your electronics adventures.
DPDT Toggle Switch
The classic! A DPDT toggle switch is what most people picture when they think of switches – it has that satisfying lever that flips up and down. I love these for projects where I want that vintage, industrial feel.
For panel mounting, a DPDT toggle switch provides a durable and accessible control option. They usually come with a threaded bushing and nut that lets you mount them securely to a panel or enclosure. Many even have waterproof boots (those rubber covers) to keep dust and moisture out.
I have had toggle switches in my workshop that have survived over a decade of use. They’re built like tanks! A quality DPDT toggle switch can withstand thousands of operation cycles, which is why you’ll find them in everything from guitar amps to industrial machinery.
DPDT Rocker Switch
These are the more modern-looking cousins of toggle switches. Instead of a lever, they have a seesaw-like button that rocks back and forth. You’ve probably pressed one today without even realizing it – they’re everywhere in modern appliances.
I prefer rocker switches for projects where aesthetics matter or when I am building something that might be used by people who aren’t familiar with electronics. They’re more intuitive to use, and there’s something satisfying about that solid “click” when you press them.
DPDT Slide Switch
These little guys are perfect when space is tight. They have a tiny slider that moves back and forth. You’ll find them in smaller gadgets where there’s not enough room for a toggle or rocker.
I’ll be honest – they’re not my favorite for high-current applications because they’re usually rated for lower currents, but they’re perfect for signal switching or battery-powered projects. I used one in a portable radio I built, and It is been working flawlessly for years.
DPDT Relay Switch
Now we’re getting fancy! A double pole double throw relay isn’t manually operated – it uses an electromagnet to move the contacts. Think of it as a switch That is controlled by electricity rather than your finger.
I love using DPDT relays when I need to control something remotely or when the circuit I am switching has too much current to safely handle with a manual switch. They’re the unsung heroes of automation projects.
DPDT Switch Applications
So what can you actually do with these switches? Let me share some of my favorite uses.
DC Motor Control
This is probably the most common use I have found for DPDT switches. By wiring a DC motor to a DPDT switch in a specific way, you can make the motor spin forward or backward with a simple flip of the switch.
The DPDT switch for DC motor control works by reversing the polarity of the voltage going to the motor. It is like magic the first time you see it work! I built a little robot with my nephew last summer, and watching his face light up when he could make it go forward and backward with a flip of the switch was priceless.
This setup is super useful for:
- Model trains (That is how they back up!)
- RC cars and boats
- Simple robotics projects
- Power windows in cars
- Garage door openers
Audio Switching
If you are into audio projects like I am, you love DPDT switches for routing stereo signals. Since audio has left and right channels, the double pole design is perfect one pole for each channel.
I built a little A/B testing box for my home studio that lets me compare two different speakers with the flip of a switch. No unplugging and replugging cables just flip and listen.
Polarity Reversal
Beyond motors, there are tons of situations where you might want to reverse the polarity of a circuit. I have used DPDT switches for:
- LED direction control (great for indicator lights that show different colors based on direction)
- Battery charging circuits
- Testing polarity-sensitive components
I once helped a friend troubleshoot a circuit by adding a DPDT switch that let us quickly test both polarities without rewiring anything. Saved us hours of work!
Home and Industrial Automation
DPDT switches are workhorses in automation systems too:
- Security systems often use them to control dual-zone alarms
- Lighting control systems use them to manage multiple light circuits
- HVAC systems use them to switch between heating and cooling
How to Wire a DPDT Switch
Alright, let’s get practical. Learning how to wire a DPDT switch correctly will prevent circuit malfunctions and save you a lot of headaches. I learned this the hard way after frying a motor controller because I got the wiring wrong!
Basic Wiring Concepts
A DPDT switch has six terminals arranged in two rows of three. The middle terminals (pins 1 and 4) are typically your “common” connections – these connect to either the left or right terminals depending on the switch position.
For standard numbering:
- Pins 1 and 4 are the common terminals
- Pins 2 and 5 connect to one position
- Pins 3 and 6 connect to the alternative position
Motor Control Wiring
Here’s how I wire a DPDT switch for motor control:
- Connect the positive power supply lead to pin 1
- Connect the negative power supply lead to pin 4
- Connect pin 2 to one motor terminal
- Connect pin 5 to the other motor terminal
- Connect pin 3 to pin 5 (cross-connection)
- Connect pin 6 to pin 2 (cross-connection)
With this setup, flipping the switch reverses the polarity to the motor, changing its direction. It is like magic, but It is just clever wiring!
Safety Considerations
Look, I have made my share of mistakes with electrical projects, so let me save you some trouble:
- Always check that your switch is rated for your circuIt is voltage and current. I once used an undersized switch that melted when I tried to control a high-current motor not fun
- Kill the power before making connections. Seriously, I can not stress this enough.
- Use the right wire gauge. Thin wires + high current = fire hazard.
- Secure all connections. Loose wires cause shorts and intermittent problems that will drive you nuts.
- Consider adding a fuse. Your future self will thank you when something goes wrong.
DPDT Switch Diagram and Schematic Representation
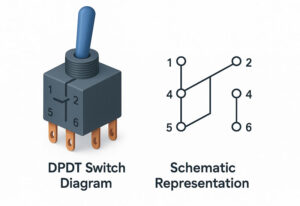
Referencing a double pole double throw switch diagram helps visualize the internal connections and operation. When I was first learning electronics, diagrams were my best friends. In schematics, DPDT switches have a specific symbol that shows all possible connections. A standard double pole double throw switch diagram shows six terminals with lines indicating how they connect in different positions. For a dpdt on on switch, the diagram shows two active positions without a center off state. When using a dpdt on on switch, both positions complete different circuits, which is perfect for applications where you need to switch between two active states rather than having an off position.
I keep a little notebook with common circuit diagrams, and my DPDT motor control wiring is dog-eared from frequent reference.
Advantages of DPDT Switch
Why do I love these switches so much? Let me count the ways:
- Versatility: They control two independent circuits simultaneously, which opens up so many possibilities.
- Simplicity: You can achieve complex switching functions with a single component. Less parts means less that can go wrong!
- Reliability: I have DPDT switches in projects I built 15+ years ago that still work perfectly. They’re mechanical, simple, and built to last.
- Cost-Effectiveness: They’re cheaper than implementing two separate switches, and who doesn’t like saving a few bucks?
- Space Efficiency: One switch instead of two means more room for other components. This has saved me countless headaches in tight enclosures.
- Visual Feedback: You can tell the switch state just by looking at it. No guessing!
- Standardization: They come in standard sizes, so replacing them is easy if needed.
- Isolation: The two circuits remain completely electrically separated, which is crucial for some applications.
I have found these advantages particularly useful in automotive projects where space is tight and reliability is essential.
DPDT vs. Other Switch Types
When comparing spdt vs dpdt switches, the main difference is in the number of circuits they control. This is something that confused me when I first started with electronics.
SPDT vs DPDT
- SPDT (Single Pole Double Throw): Controls just one circuit that can connect to one of two outputs. It has three terminals.
- DPDT (Double Pole Double Throw): Controls two separate circuits simultaneously, each connecting to one of two outputs. It has six terminals.
The spdt vs dpdt decision comes down to whether you need to control one circuit or two. If you are just switching a single LED, an SPDT is simpler. But for stereo audio or motor direction control, you’ll need a DPDT.
DPST vs DPDT:
Another comparison that trips people up:
- DPST (Double Pole Single Throw): Controls two separate circuits but can only turn them on or off together. It has four terminals.
- DPDT (Double Pole Double Throw): Controls two circuits and can connect each to one of two different outputs. It has six terminals.
Think of DPST as a regular light switch that controls two lights at once. DPDT is more like a three-way switch that can route power in different directions.
Product Recommendations:
After trying dozens of different switches over the years, here are some that I personally recommend:
For General Electronics Projects
Carling Technologies 2GM51-73
- Rating: 20A at 125VAC
- Features: Screw terminals, ON-ON configuration
- Best for: High-current applications, industrial controls
- Price range: $15-20
- My take: These are built like tanks. I have had one controlling my shop vac for years without issues.
E-Switch 100DP3T1B1M1QEH
- Rating: 6A at 125VAC
- Features: Solder lugs, ON-OFF-ON configuration
- Best for: Audio equipment, signal switching
- Price range: $8-12
- My take: Great quality, smooth action, and the center-off position is super useful for my audio projects.
For Automotive Applications
Nilight Rocker Switch
- Rating: 20A at 12VDC
- Features: Waterproof, illuminated, snap-in mounting
- Best for: Vehicle accessories, marine applications
- Price range: $6-10 per switch
- My take: I installed these in my off-road vehicle, and they’ve survived mud, rain, and even a drink spill!
For PCB Mounting
C&K Components 7211J2ZQE2
- Rating: 0.4VA maximum
- Features: Right-angle mounting, miniature size
- Best for: Signal-level switching on circuit boards
- Price range: $2-4
- My take: Perfect for tight spaces. I use these in all my custom PCB designs.
For Heavy-Duty Applications
Signal Tech 33007 DPDT Switch
- Rating: 120VAC
- Features: Brushed stainless steel construction, integrated indicator lights
- Dimensions: 4.5″ H x 2.75″ W x 1″ D
- Price: Around $70
- Best for: Industrial control panels, high-reliability applications
- My take: Expensive but worth every penny for critical applications. I installed one in my workshop power distribution panel five years ago, and it still works like new.
Installation and Maintenance Tips
Let me share some hard-earned wisdom about keeping your switches working reliably:
- Mounting: Make sure It is secure! A loose switch will cause intermittent problems that will drive you crazy. I always use lock washers with my panel-mount switches after one vibrated loose in a mobile application.
- Wiring: Use the right wire gauge for your current. I prefer stranded wire for most applications because it handles vibration better than solid wire.
- Strain Relief: Do not pull on those wires! I add a dab of hot glue or a zip tie as strain relief to prevent tugging on the terminals.
- Sealing: For outdoor projects, get switches with proper IP ratings. I learned this lesson after rain killed a project I left outside.
Maintenance
- Regular Inspection: I check my switches every few months for loose connections or signs of wear.
- Contact Cleaning: If a switch starts acting flaky, a shot of contact cleaner can often bring it back to life. I have rescued several “dead” switches this way.
- Lubrication: Some switches benefit from a tiny drop of electronic-grade lubricant. Just be careful not to overdo it!
- Replacement Schedule: For critical applications, I replace switches preventively before they fail. Better safe than sorry!
Conclusion: Why DPDT Switches Deserve Some Love
After spending way too many hours playing with these switches over the years, I have come to appreciate their elegant simplicity and incredible versatility. From simple projects to complex systems, DPDT switches offer reliable control that just works.
Whether you are a hobbyist working on your first motor control project or a seasoned engineer designing industrial systems, I hope this guide has given you some useful insights into the world of DPDT switches.
Remember that proper selection, wiring, and installation are key to getting the most from these versatile components. Consider your voltage and current requirements, environmental conditions, and specific application needs when choosing the right switch for your project.
Got questions about using DPDT switches in a specific application? Drop a comment below! I love hearing about creative uses for these humble but powerful components.

