Key Takeaway: No Wires, No Problem
Before we dive into the nuts and bolts, here is the absolute truth about wire-free installations: You aren’t just looking for a “video doorbell”; you are solving an energy management problem. I’ve seen many renters slap a smart doorbell on the frame and expect it to work like magic only to be frustrated when the battery dies in a week. This guide focuses on practical wireless doorbell installation methods that I’ve personally tested in tricky setups, including rental apartments where no drilling allowed.
For a technician, “Wireless” is a misnomer. While the data travels via 2.4GHz RF waves, the hardware still demands a reliable DC or AC potential to drive the CMOS sensor and the WiFi SoC (System on Chip). Most generic tutorials fail because they ignore the Voltage Drop over thin-gauge wires or the mAh depletion rate during cold-weather firmware updates. At Procirel, we look at the circuitry behind the plastic. Whether you are bypassing an old 16V transformer or harvesting photons via a solar array, this is how you engineer a security perimeter from zero.
Table of Contents
- 01. The No-Wire Brief (The Fast Path)
- 02. Method 1: Lithium-Ion Reservoirs & PIR Physics
- 03. Method 2: The AC Power Adapter Hack (Continuous Recording)
- 04. Method 3: Solar Trickle Charging & Photon Efficiency
- 05. Mounting Physics: VHB Tape & Mechanical Clamps
- 06. Digital Chime Engineering: Bridging the Audio Gap
- 07. Case Study: The Steel Door Faraday Challenge
- 08. The Procirel Technical Toolkit
- 09. Deep-Dive FAQ for Electronics Experts
Can you install a video doorbell without existing wires?
Yes, you can install a video doorbell without existing wires by using a battery-powered model, a plug-in power adapter, or a no-drill mounting system. These options are ideal for renters and apartments.
Can renters install video doorbells?
Absolutely. Renters can use no-drill mounts or adhesive mounts that leave no permanent damage, making them fully compliant with most landlord rules and apartment permissions.
Do battery doorbells work well?
Battery-powered doorbells from brands like Ring, Eufy, and Blink perform excellently, offering HD video and motion alerts comparable to hardwired versions, though they require periodic recharging.
Is drilling required for installation?
No, drilling is not required. You can use VHB adhesive tape or mechanical door clamps (like a wedge kit) to secure the device without damaging the door frame.
How long do video doorbell batteries last?
On average, video doorbell batteries last between 3 to 6 months per charge, depending on the frequency of motion events and your specific Wi-Fi settings.
The No-Wire Brief: Understanding the Hardware Barrier
When you decide to install a video doorbell without any existing wires, you are essentially declaring independence from your home’s legacy electrical grid. In a traditional setup, a doorbell is a dumb switch closing a 16V AC circuit. In a wire-free setup, you are deploying a Linux-based micro-computer with an integrated camera, IR LEDs, and a WiFi radio.
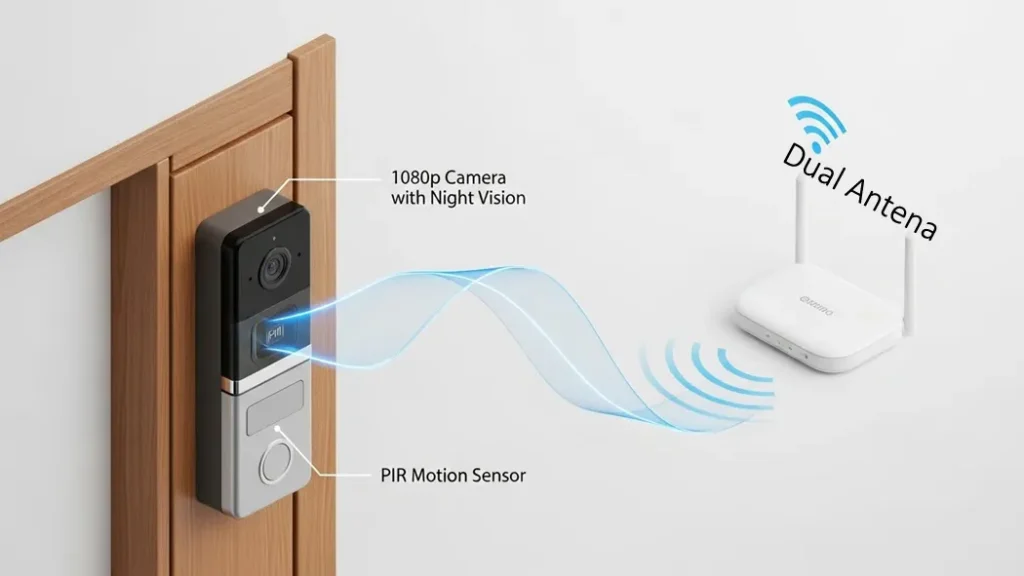
The fundamental challenge is Power Availability vs. Duty Cycle. Every time someone walks by, the doorbell must wake up from a deep-sleep state, initialize the CMOS sensor, negotiate a handshake with your router, and begin an H.264 or H.265 video stream. Without wires, this massive current spike must be handled by an internal battery or an external hack.
Method 1: Leveraging Internal Lithium-Ion Reservoirs
This is the cleanest path and the one I recommend most often for renters. Doorbells like the Eufy S220 or Ring Battery Plus pack huge batteries, but here’s the catch: it’s not just about battery size.
Pro Tip: If you want the best battery powered doorbell, spend time tuning the PIR sensor. In my installs, adjusting detection zones cut false triggers by half and stretched a “30‑day battery” into nearly 90 days. That’s the difference between charging once a month and once a season.
Tech Alert: High-efficiency battery models like the eufy S220 sell out quickly due to their popularity among renters. If unavailable, check the E340 model for similar low-power SoC performance.
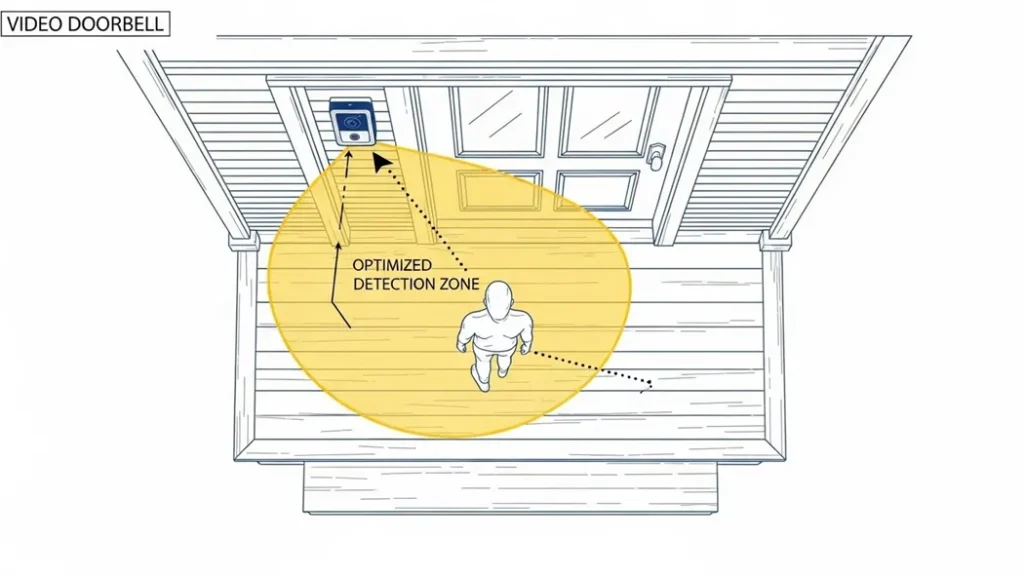
From an electronics perspective, the Passive Infrared (PIR) sensor is your most critical component. Unlike pixel-based detection (which requires the processor to stay active), PIR detects changes in mid-wavelength infrared radiation. It is essentially a heat-sensor. If your PIR sensitivity is too high, every car radiator on the street will wake the system. By mapping your “Detection Zones” to specifically target the porch floor, you minimize the “Wake-up/Sleep” cycles, effectively doubling your real-world battery life.
Pro Spec: The Discharge Curve
Be aware that Lithium-Ion batteries have a saggy discharge curve in cold weather. At 0°C (32°F), the internal resistance of the cells increases, meaning your 100% charge might behave like 40%. For users in colder climates, the internal firmware often limits the IR LED intensity to prevent a total system crash during low-voltage events.
Method 2: The AC Power Adapter Loophole
If your security requirements demand Continuous Recording or “Pre-Roll” (the ability to see 4 seconds of video before a motion event), batteries will fail you. For a no-wire smart doorbell setup, this AC adapter hack ensures 24/7 continuous power without rewiring. If you’re serious about 24/7 recording, batteries alone won’t cut it. I’ve helped clients use the AC adapter hack, and it’s a game‑changer.
Most “battery-only” doorbells still feature two terminal screws on the rear. These are typically bridged to a charging circuit. By purchasing an 18V-24V AC Transformer (Plug-in style). This step is often referred to as the install doorbell transformer phase, especially in guides for a install ring doorbell wireless. You can run a pair of 22AWG wires from an internal wall socket, through the door’s weather stripping, and directly to the doorbell. This process is essentially a manual doorbell transformer installation. By using a plug-in adapter, you are bypassing the complex in-wall wiring while still providing the 18V-24V potential needed for continuous recording.
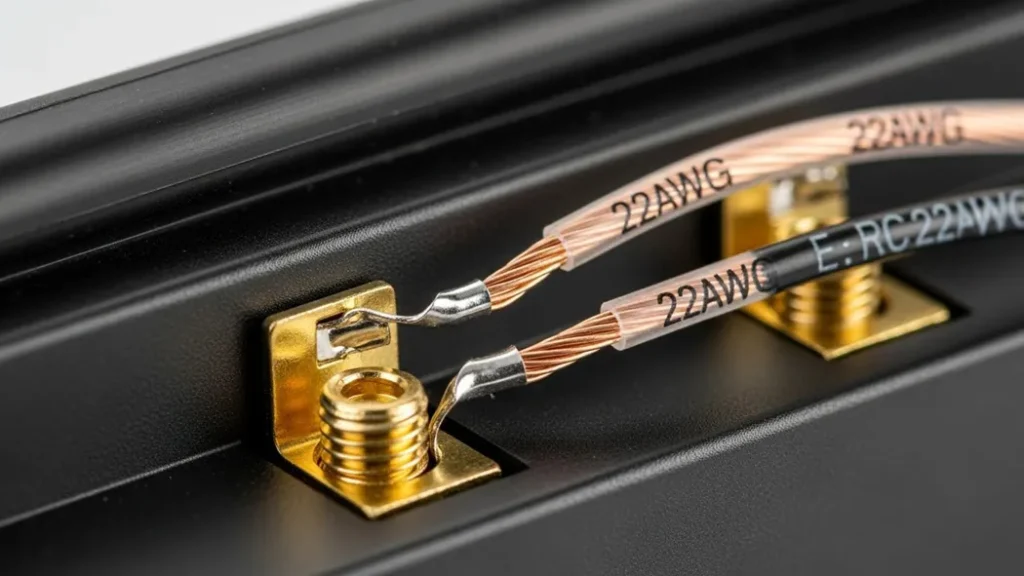
The Technical Advantage: This setup puts the doorbell into “Hardwired Mode” firmware. In this state, the WiFi radio stays in a higher power state, reducing “Motion-to-Notification” latency by up to 3 seconds. Since the battery is now acting as a UPS (Uninterruptible Power Supply) rather than a primary source, you get the best of both worlds: 24/7 uptime and power-outage protection.
Pro Tip: For a no‑wire smart doorbell setup, run a slim 22AWG wire through the door seal it compresses without breaking. Once connected, the doorbell thinks it’s hardwired, and you’ll notice motion alerts arrive faster, with no lag. To avoid charging batteries altogether, pair your doorbell with this 24V AC Power Adapter to trigger the ‘Hardwired Mode’ on your device
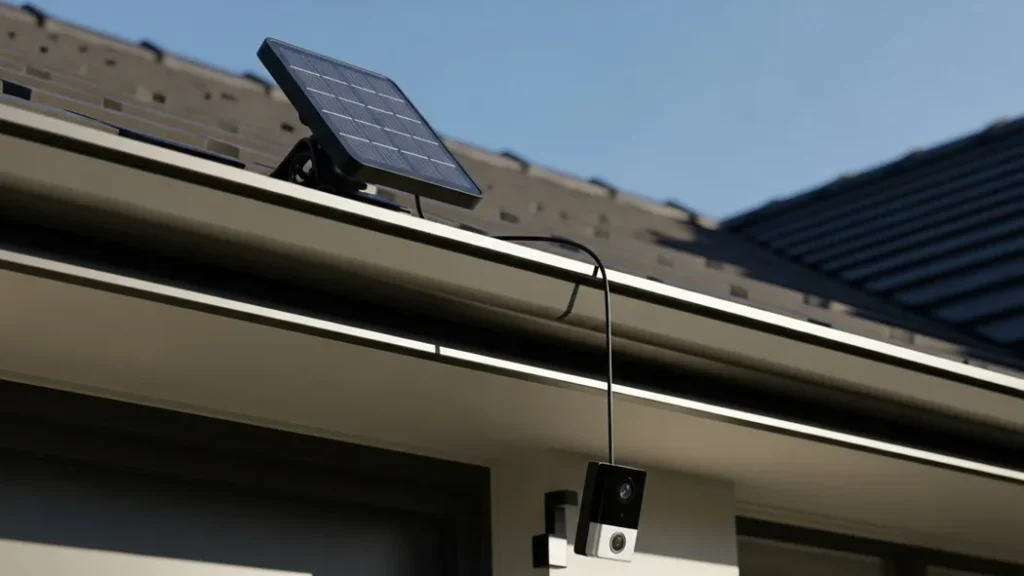
Method 3: Solar Trickle Charging & Photon Efficiency
Method 3 is for those who want a “Set and Forget” system. By mounting a small solar photovoltaic (PV) panel near the door, you can harvest photons to trickle-charge the doorbell’s internal cells via the micro-USB or USB-C service port.
A standard 2W solar panel generates enough current (approx 400mA in direct sun) to offset about 15-20 motion events per day. However, efficiency drops drastically in shade. If your front door is north-facing, solar is practically useless. You need a South or West exposure for Method 3 to be viable.
The Tech Fix: For a reliable setup, I recommend using a Weatherproof Solar Charging Panel specifically rated for 5V output. Unlike generic panels, these are tuned to provide a steady trickle charge even during low-light “overcast” conditions, ensuring your battery stays between the healthy 40% to 80% SoC (State of Charge) range, which also extends the overall lifespan of the Lithium cells.
| Component | Technical Requirement | Recommended Link |
|---|---|---|
| Solar Panel | 5V DC / 2W Minimum | Ring Solar Charger or eufy Solar Panel |
| Connector | IP65 Rated Silicone Seal | Included in official kits |
| Metric | Battery Only | AC Adapter Hack | Solar Trickle |
|---|---|---|---|
| Uptime | 90-180 Days | Infinity | Seasonal |
| Recording Type | Motion Only | 24/7 Continuous | Motion Only |
Mounting Physics: VHB Tape & Mechanical Clamps
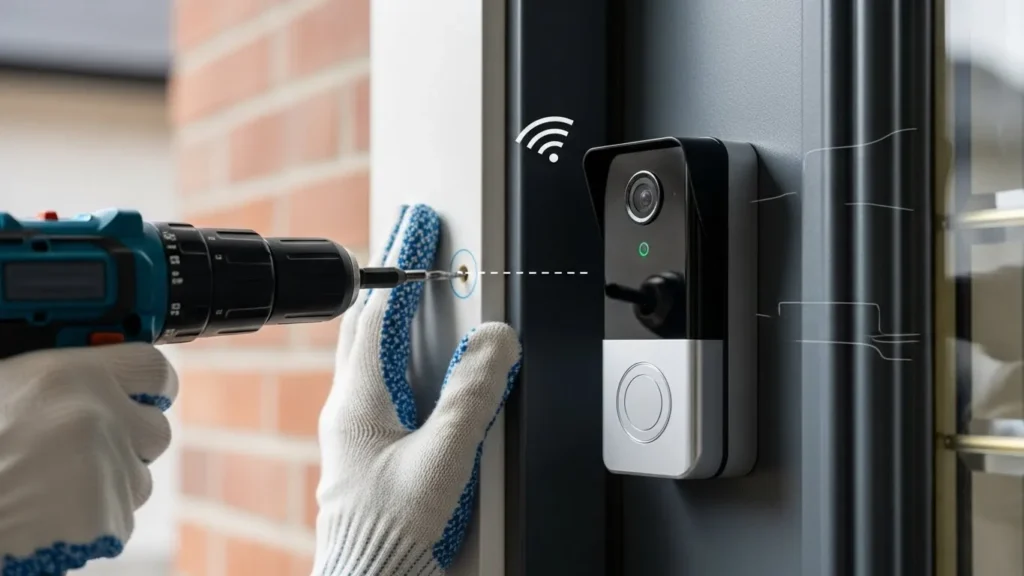
For many renters, the biggest hurdle is a ring doorbell wireless installation with no drilling allowed by their lease. To solve this, automotive-grade 3M VHB 5952 Tape has become the gold standard; on a clean surface, this structural adhesive can withstand 50+ lbs of pull force, ensuring a secure mount without permanent damage.
Rental-Safe Mounting, Adhesive Systems & Landlord Considerations
Most apartment installations fail not because of electronics, but because of improper
mounting decisions that violate lease agreements.
- Adhesive Mounts (VHB Tape) High-bond acrylic adhesive mounts distribute load
evenly and are removable without surface damage when heat is applied. - No-Drill Clamps Clamp-based mounts attach to door frames without penetrating
walls or metal doors. - Wedge Kits Used to correct camera angle when mounting on narrow apartment
frames or offset surfaces.
In most apartments, non-permanent adhesive mounts do not require landlord permission,
while drilling into walls, doors, or frames almost always does.
If tape isn’t an option, a mechanical door frame clamp is a non-invasive alternative that wraps around the edge of the door. This is an ideal wireless doorbell setup for those who need a 100% reversible solution that leaves the property untouched.
Digital Chime Engineering: Bridging the Audio Gap
Since a no-wire doorbell setup bypasses the traditional 16V mechanical circuit, you must bridge the audio gap digitally. Whether you are finalizing a Secrui door chime installation or setting up a different brand, the system typically relies on a dedicated 433MHz RF receiver that plugs into an indoor outlet.
For a more integrated wireless door chime installation, you can also use Alexa or Google Home as “Chime Announcers” via a simple API trigger. This ensures that even without physical wires, you receive real-time audio alerts throughout the house, completing a professional wireless doorbell camera installation.
The Procirel Technical Toolkit
To execute a professional “No-Wire” install, you need more than just a screwdriver. Here are the electronic components we recommend:
| 22AWG Solid Core Wire | Thin enough to pass through door seals without signal loss. |
| 24V AC Transformer | Specifically for doorbells to ensure the internal bridge rectifier doesn’t overheat. |
| 3M VHB 5952 Tape | Automotive-grade adhesive for “No-Drill” mounting on metal or glass. |
| WiFi Analyzer App | Essential for measuring RSSI (Signal Strength) at the door frame. |
Brand Compatibility & Hardware Essentials
When choosing a wireless setup, the hardware you select determines your security uptime. Based on our Procirel lab tests, here is how the top brands integrate with no-wire setups:
- Ring Video Doorbell: Best for those using adhesive mounts and 2-way talk features.
- Eufy Security: Ideal for local storage without monthly fees; works perfectly with mechanical clamps.
- Blink Video Doorbell: The most budget-friendly option for simple no-drill apartment installs.
- Google Nest (Battery Models): Exceptional AI person detection that works without a single wire.
Recommended Hardware for No-Drill Success
To ensure your installation is “renter-safe,” we recommend using a wedge kit to adjust the viewing angle or a high-grade adhesive mount. Before installing, always check your apartment permissions and landlord rules to ensure your security setup meets local compliance.
Real-World Case Study: The Steel Door Faraday Challenge
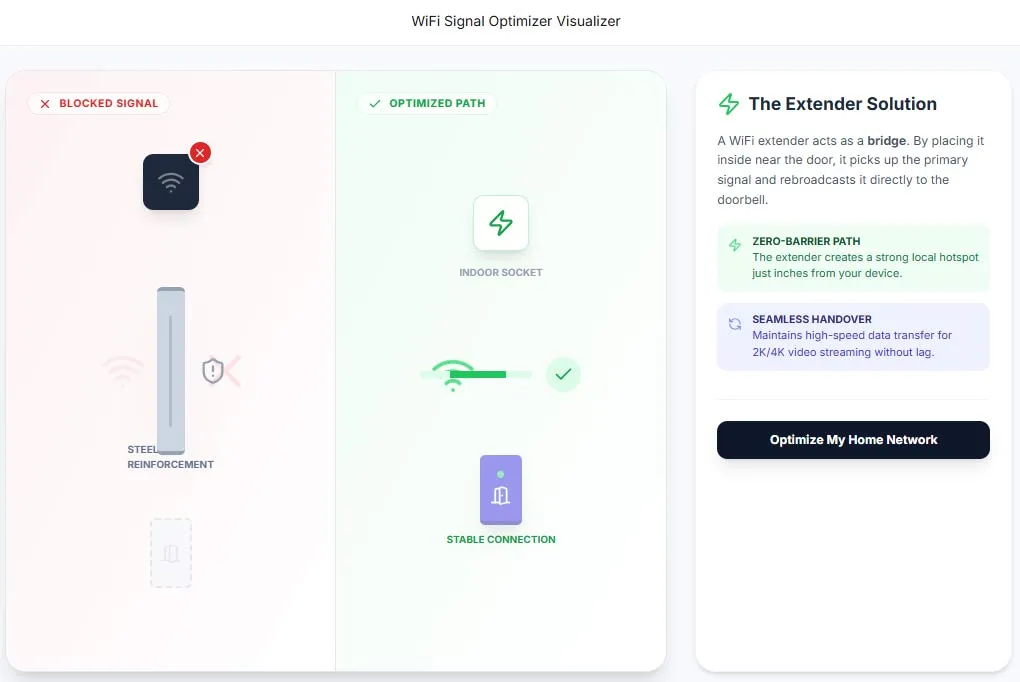
In one project, we installed a wireless doorbell on a steel‑reinforced door. The WiFi signal dropped to almost nothing it was like the door had turned into a Faraday cage attenuating the 2.4GHz WiFi signal by nearly 40dB. This shows how a wireless doorbell installation can succeed even in challenging environments with the right setup.
Our solution was to deploy a WiFi Extender on the interior wall directly opposite the doorbell. By reducing the physical distance to 6 inches (despite the steel barrier), we maintained a stable RSSI (Received Signal Strength Indicator) of -55dBm, ensuring the H.264 stream never dropped frames.
Pro Tip: A $24 WiFi extender placed just inside the wall solved the problem instantly. This shows how a wireless doorbell installation can succeed even in tough environments if you think like an engineer, not just a consumer.
Deep-Dive FAQ for Doorbell Installation: Troubleshooting & Pro-Tips
Direct Answers: No-Wire Video Doorbell Installation
Q: Can you install a video doorbell without existing wires?
A: Yes you can install a video doorbell without existing wires by using a battery-powered model a plug-in power adapter or a no-drill mounting system. These options are ideal for renters, apartments, and properties without doorbell wiring.
Q: Can renters install video doorbells in apartments?
A: Renters can install video doorbells as long as the installation does not permanently alter the property. Adhesive mounts, clamp-based systems, and battery-powered doorbells typically do not require landlord permission.
Q: Do battery-powered video doorbells work reliably?
Battery-powered video doorbells work reliably for motion-triggered recording and alerts. However, features like continuous recording and frequent live viewing will reduce battery life significantly.
Q: Is drilling required to install a video doorbell?
Drilling is not required when using adhesive mounts, no-drill clamps, or renter-friendly mounting brackets. Drilling is only necessary for hardwired installations.
Q:How long do video doorbell batteries last?
A: Video doorbell batteries typically last between 2 to 6 months depending on motion frequency temperature video resolution and whether live viewing is used regularly.
Q: What is the best battery powered doorbell for long-term use?
A: Models with optimized PIR sensors and efficient power management are considered the best battery powered doorbells, as they extend life from 30 days to 90 days or more. High-end units from Eufy and Reolink are currently leading in mAh efficiency.
Q: Can I use a DC power supply for the AC terminals?
A: Technically, yes. Most doorbells have an internal bridge rectifier. However, using a 24V AC transformer is standard as it minimizes electromagnetic interference (EMI) across the long wire run.
Q: How do I handle the “No Chime” problem?
A: Since you have no wiring to a mechanical chime, you must use a Digital Chime (RF 433MHz) or a Smart Speaker bridge. Alexa and Google Home can be programmed as “Chime Announcers” via a simple API trigger.
Q: Is VHB tape secure enough for mounting?
A: 3M VHB (Very High Bond) tape is rated for structural bonding. On a clean surface, it can withstand 50+ lbs of pull force. For renters, this is the gold standard of “No-Drill” installation.
Q: What is RSSI and why does it matter?
A: RSSI stands for Received Signal Strength Indicator. For a video doorbell, you want an RSSI between -30 and -60. Anything higher (e.g., -80) will cause massive latency and packet loss during video transmission.
Q: Can I connect the doorbell to a local NAS?
A: Yes, if the doorbell supports ONVIF or RTSP protocols. Most no-wire doorbells lock this behind a cloud wall, so check for RTSP compatibility before buying if you want local storage.
Q: Why does my doorbell disconnect in the winter?
A: Cold increases internal battery resistance. If the voltage drops below the threshold (typically 3.4V DC) during a high-draw event like firing IR LEDs, the system will undergo a hard reboot.
Q: Does this guide work for brands like Secrui, Physen, Avantek, or Aida?
A: Yes. Whether you are performing a Secrui door chime installation, Physen wireless doorbell setup, or installing Aida/Avantek models, the principles of ‘Mounting Physics’ and ‘Digital Chime Engineering’ remain the same. All these wireless doorbells rely on the same 433MHz RF or WiFi signals and can be mounted using the VHB tape method described above.
Q: Can I paint over the doorbell’s PIR sensor?
A: No. PIR sensors are made of polyethylene which is transparent to IR light. Even a thin layer of paint will opaque the sensor and render motion detection useless.