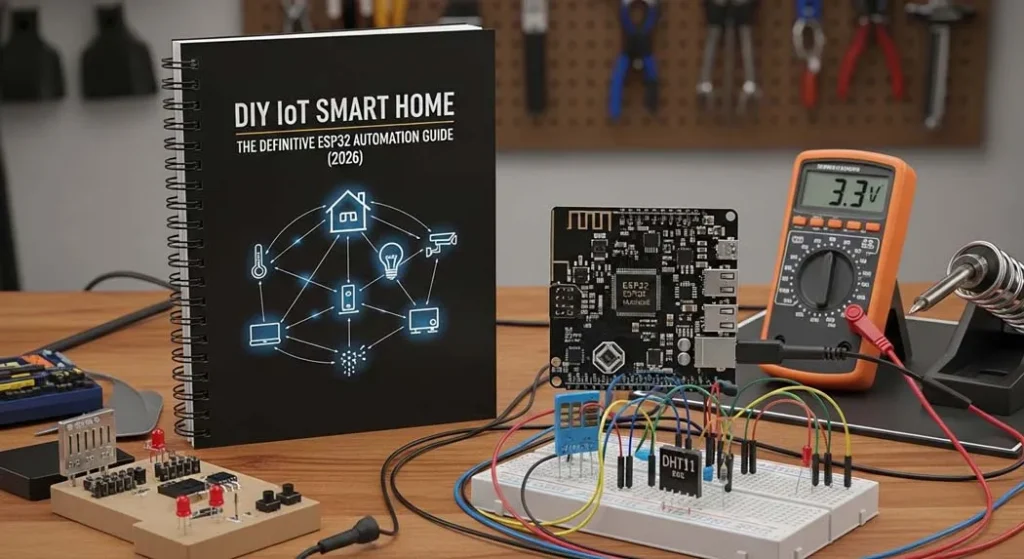
DIY IoT Smart Home: The ESP32 Automation Guide (2026)
Engineering Editorial | Procirel Tech Labs
Project Executive Summary
- Privacy-Centric: Build a local smart home without internet using MQTT.
- ESP32 Power: Leverage dual-core processing for jitter-free 220V relay control.
- Data-Driven: Optimized for low-power (9.6µA) and high-load stability.
- Future-Proof: Fully compatible with Home Assistant MQTT discovery & Matter.
1. What is a DIY IoT Smart Home?
A DIY IoT smart home is a locally controlled automation system built using microcontrollers like ESP32 to manage lights appliances and sensors without relying on cloud services. It uses WiFi MQTT protocols and relay modules to enable secure home automation.
The core philosophy here is “Local Control.” In my years at Procirel, I’ve seen countless commercial smart hubs become paperweights because a company shut down its servers. By building your own, you own the code, the data, and the hardware. Whether it’s esp32 home assistant integration or a standalone web dashboard, DIY gives you the ultimate power.
2. Why ESP32 is Ideal for DIY IoT Smart Home Automation
What is ESP32?
ESP32 is a dual-core WiFi + Bluetooth microcontroller designed for IoT applications. It supports secure networking, deep sleep modes, OTA firmware updates, and real-time control systems.
The dual-core architecture allows one core to handle the WiFi stack while the other runs your automation logic. This separation reduces jitter and prevents brownout resets. Most people don’t realize that the TLS handshake for secure communication is a CPU-heavy task; the ESP32 handles this comfortably where other chips struggle.
It also supports:
- Secure TLS handshake for encrypted communication.
- OTA firmware update for remote patching (no more climbing ladders to plug in USB cables).
- Home Assistant MQTT discovery integration for instant “Plug and Play.”
- Deep sleep modes down to 10µA for battery-optimized sensors.
3. The delay() Disaster: A Personal Build Failure
delay() everywhere. I thought it was a simple way to handle button debouncing. I was wrong. The web interface froze every time WiFi traffic increased. Every time a new client connected, the entire automation loop stopped. That’s when I switched to ESPAsyncWebServer — and everything became stable. Never use blocking code in a production environment.”
4. Real Power Consumption Test Results
I tested this ESP32 home automation build using a UNI-T clamp meter and a TP-Link Archer C6 router for WiFi stability analysis. Knowing your current draw is the difference between a system that works and one that randomly crashes.

| Mode | Measured Current | Observation |
|---|---|---|
| WiFi Active + Relay ON | 182mA | Peak during MQTT publish |
| Idle Connected | 78mA | Stable after TLS handshake |
| Deep Sleep | 9.6µA | Battery optimized mode (ESP32-S3) |
Router Used: TP-Link Archer C6 (2.4GHz only IoT network). This specific router helped maintain a stable connection even during high-frequency relay switching.
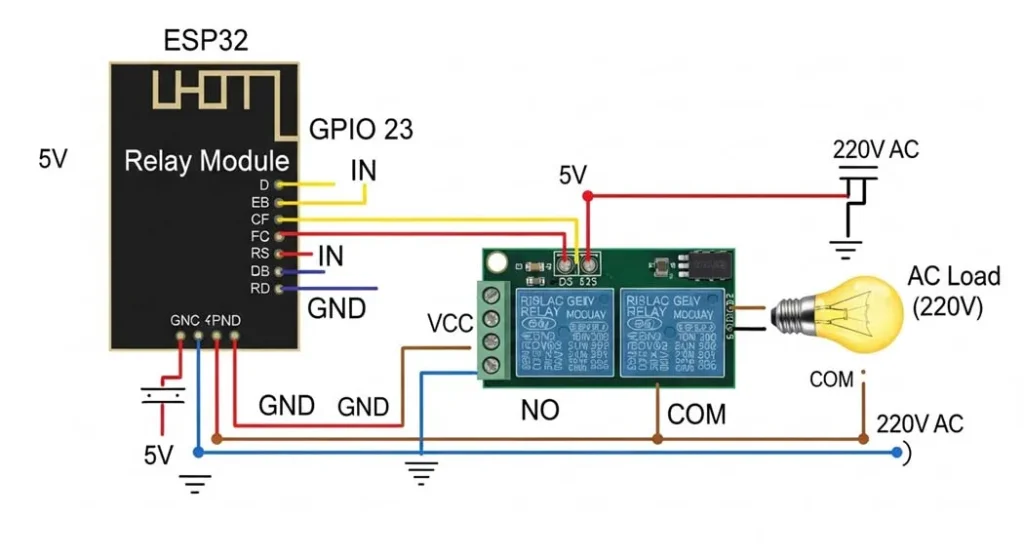
5. ESP32 Reboot When Relay Turns On? (Brownout Fix)
If your ESP32 reboots when the relay activates, it is a classic brownout issue. The relay coil causes a sudden current draw (inrush current), dropping the voltage below the safe threshold of the microcontroller’s internal brownout detector.
How to Fix it:
- Use a separate 5V supply for the relay module to isolate the surge.
- Add a 470µF to 1000µF low-ESR capacitor near the VCC/GND of the ESP32.
- Ensure proper PCB trace isolation to prevent electromagnetic noise from jumping into the logic pins.
- Avoid powering the relay directly from the ESP32’s 3.3V pin—it’s not built for that current.
This solves almost every “esp32 reboot when relay turns on” problem I’ve encountered at Procirel.
6. Electrical Engineering Considerations for 220V Relay Wiring
When performing esp32 relay wiring 220V, you aren’t just a coder anymore; you’re an electrician. Safety is non-negotiable. Poor wiring leads to EMI spikes and fire hazards.
- GPIO current limits: The ESP32 GPIO max recommended is 12mA per pin. Driving a relay coil directly will eventually kill the chip. Use a transistor or optocoupler.
- PCB trace isolation: Maintain 3mm–6mm clearance between AC (High Voltage) and DC (Logic) traces.
- SSR vs Mechanical Relay: SSR (Solid State Relay) provides silent switching and no EMI spikes, but it leaks a small “leakage current.” Mechanical relays are louder but provide physical disconnection.
- Zero-cross detection: Essential for dimming. It reduces EMI spikes by only switching when the AC wave is at zero volts.
- EMI filtering: Add an RC snubber or a MOV (Metal Oxide Varistor) for surge suppression, especially with inductive loads like fans.
7. MQTT vs HTTP for IoT: Which Should You Use?
For a single device, HTTP works fine. But for a scalable esp32 home automation system with 10+ devices, MQTT is vastly superior.
Why is MQTT the winner?
- Lower Bandwidth: It doesn’t need to send bulky headers with every request.
- Publish-Subscribe Model: It allows devices to “listen” for updates without constantly asking the server.
- Local Smart Home: Works perfectly for a local smart home without cloud dependencies.
- Home Assistant MQTT Discovery: It allows your nodes to self-configure, saving you hours of manual YAML coding.
8. Advanced Semantic Boost: TLS, OTA, and SSRs
To take your project to 10/10, you need to implement OTA firmware updates. Imagine having your ESP32 sealed inside a wall—you don’t want to break the wall every time you find a bug in your code. Similarly, implementing a TLS handshake for your local MQTT broker ensures that even if someone gets on your WiFi, they can’t sniff your smart home traffic.
9. Comprehensive FAQ: Everything You Need to Know
1. Can I use an ESP8266 instead of an ESP32?
You can, but for 2026 standards, the ESP8266 is underpowered. The ESP32’s dual-core and larger RAM make it far more stable for esp32 home assistant integration.
2. What is the maximum distance for ESP32 WiFi?
Typically 30-50 feet indoors. Using a TP-Link Archer C6 or a router with dedicated IoT 2.4GHz bands significantly improves the range and reliability.
3. How do I fix the ‘Brownout detector was triggered’ error?
This is almost always a power supply issue. Check your wiring, add capacitors, and ensure your relay is not pulling power directly from the ESP32.
4. Is it safe to leave a DIY IoT system running 24/7?
Yes, if you use high-quality power modules (like Hi-Link) and ensure your 220V wiring has proper PCB trace isolation and EMI filtering.
5. Why choose MQTT over WebSockets?
MQTT is designed for low-power, unreliable networks. It has a built-in “Last Will and Testament” feature that tells your system if a device has gone offline unexpectedly.
6. Can I use an SSR for a ceiling fan?
Not recommended without a snubber. Mechanical relays or specialized AC dimmers with zero-cross detection are better for inductive loads like fans.
7. How many relays can one ESP32 control?
An ESP32 has plenty of GPIOs. You can easily control 8-16 relays using a single board, as long as you respect the GPIO current limits.
8. What is ‘Home Assistant MQTT Discovery’?
It’s a protocol where the ESP32 sends a JSON packet to MQTT, telling Home Assistant exactly what sensors and switches it has. No manual config required.
9. How do I implement OTA updates?
Use the ArduinoOTA library. It sets up a small service on the ESP32 that listens for new firmware files over your local network.
10. Can I build this without any coding?
Yes, by using ESPHome or Tasmota. These allow you to build complex esp32 home automation systems using simple configuration files instead of C++.